
Staying ahead in the competitive world of gaming streams means more than just a great internet connection. If you’re pushing the limits with fast paced titles like Apex Legends, Call of Duty, or League of Legends, the way you capture and broadcast your gameplay can make or break your channel. That’s why finding the best Twitch OBS settings for fast paced games is critical. In this guide we’ll dive deep into the exact tweaks that keep your stream smooth, clear, and engaging.
We’ll cover everything from bitrate and resolution to CPU usage and hotkeys. By the end, you’ll know how to configure OBS for buttery‑smooth gameplay, how to avoid dropped frames, and why certain settings matter more than others in high‑speed scenarios.
Let’s jump into the world of low‑latency, high‑frame‑rate streaming and unlock the full potential of your Twitch channel.
Understanding the Core Requirements for Fast Paced Games
Why Frame Rate Matters in Competitive Streaming
Fast paced games thrive on millisecond reactions. A low frame rate or high latency can distort the viewer’s experience and even affect your own reaction time. In competitive titles, a frame rate of 60 fps or higher is the gold standard.
OBS can capture game footage at up to 60 fps, but only if the source device and network can handle it. Setting the correct FPS in OBS prevents unnecessary strain on your CPU.
Choosing the Right Resolution and Bitrate
Higher resolutions deliver sharper visuals but demand more bandwidth. A balance is essential: 720p at 60 fps is reliable for most home connections, while 1080p at 60 fps is ideal for higher‑end setups.
When you set your bitrate, keep in mind Twitch’s limits. For 720p60, a bitrate of 4,000 kbps is optimal. For 1080p60, aim for 6,000 kbps to 8,000 kbps.
CPU vs. GPU Encoding: Which Path to Choose?
Encoding can be done either on your CPU (x264) or GPU (NVENC/AMD VCE). GPU encoding offloads the CPU, freeing resources for gameplay. However, newer CPUs support hardware‑accelerated encoding with comparable quality.
For most gamers, NVENC on an NVIDIA card or AMD VCE on an AMD card provides the best mix of performance and quality.
Optimizing OBS Settings for Low Latency on Twitch
Enable Low Latency Mode in OBS Studio
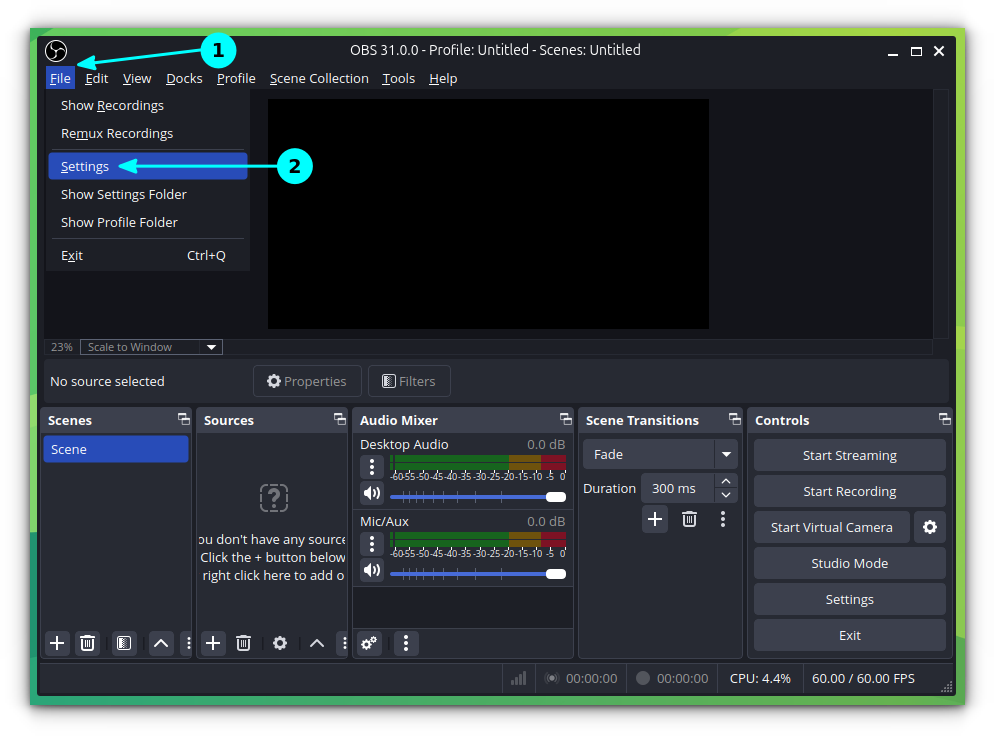
Navigate to File > Settings > Stream. Toggle “Low Latency” to reduce the delay between your stream and Twitch’s servers. This mode prioritizes speed over quality, which is ideal for fast paced games.
When low latency is enabled, OBS automatically sets the keyframe interval to 2 seconds, aligning with Twitch’s requirements for higher frame rates.
Use Twitch’s Custom Stream Key
Input your unique stream key from the Twitch dashboard. Double‑check it to avoid accidental duplication. A mismatched key can cause stream failures.
Set Encoder Preset to ‘Quality’ or ‘Max Performance’
In the “Output” tab, under Encoder, choose your GPU encoder (e.g., NVENC). Set the “Preset” to “Quality” for better visual fidelity or “Max Performance” to reduce resource usage.
Adjust Output Scaling to Match Your Setup
If you’re streaming at 720p, set the output resolution to 1280×720. This reduces the load on your encoder and network, ensuring stability.
Fine‑Tuning Audio for a Polished Stream
Separate Game and Mic Audio Tracks
In OBS, add two audio sources: one for game audio and one for your microphone. Assign each to a different audio track (Track 1 for game, Track 2 for mic). This separation allows better post‑stream editing.
Use Noise Gate and Compressor for Microphone Clarity
Apply a Noise Gate to filter out background hum. Follow it with a Compressor to even out volume levels. Keep thresholds low to avoid clipping during loud moments.
Set Audio Bitrate to 160 kbps
A 160 kbps bitrate for your mic provides clear audio without excessive bandwidth usage. Adjust if you have higher or lower bandwidth constraints.
Configure Audio Monitoring for Live Feedback
Enable “Monitor and Output” for your mic source. This lets you hear yourself in real time, preventing unexpected volume spikes.
Hotkeys and Scene Management for Quick Switching
Assign Hotkeys for Fast Scene Transitions
In Settings > Hotkeys, map keys for switching between scenes, starting/stopping the stream, and muting audio. Quick access reduces lag during intense gameplay moments.
Use Two Scene Layouts: Gameplay and Intermission
Keep a primary “Gameplay” scene and a secondary “Intermission” scene with overlays, sponsors, or social media links. During breaks, switch instantly to keep viewers engaged.
Enable Auto‑Start and Auto‑Stop for OBS
Under Settings > General, enable “Auto‑Start” and “Auto‑Stop” to ensure OBS launches with your computer and shuts down cleanly after the stream.
Testing and Monitoring Performance in Real Time
Use OBS’s Performance Monitor
Open the “Stats” window in OBS to monitor CPU usage, FPS, and dropped frames. A stable 60 fps with minimal dropped frames indicates a healthy stream.
Check Network Latency and Packet Loss
Run a speed test on speedtest.net. Aim for upload speeds >10 Mbps for 720p60 and >20 Mbps for 1080p60. Use tools like Twitch Studio’s network diagnostics to spot packet loss.
Regularly Update OBS and Drivers
Ensure OBS, your GPU drivers, and any plugins are up to date. Updates often include performance improvements and bug fixes that benefit low‑latency streaming.
Comparison Table: OBS Settings for 720p vs 1080p Fast Paced Games
| Aspect | 720p60 (Recommended) | 1080p60 (High‑End) |
|---|---|---|
| Resolution | 1280×720 | 1920×1080 |
| Bitrate | 4,000 kbps | 6,000‑8,000 kbps |
| Encoder | NVENC (Preset: Quality) | NVENC (Preset: Max Performance) |
| CPU Usage | ≤30% | ≤45% |
| Expected FPS | 60 fps | 60 fps |
| Network Upload | ≥10 Mbps | ≥20 Mbps |
Pro Tips for Mastering Twitch OBS on Fast Games
- Use a Wired Connection – A wired Ethernet connection reduces latency and packet loss compared to Wi-Fi.
- Cap Your Frame Rate – Set a cap of 60 fps in the game’s graphics settings to match OBS output.
- Profile Your Stream – Create multiple OBS profiles for different games; this saves time switching configurations.
- Background Process Clean‑up – Close unnecessary applications before streaming to free RAM and CPU.
- Monitor Fans and Temperatures – High heat can throttle performance; keep your GPU below 80 °C.
- Use OBS Filters – Apply “Color Correction” for vibrant overlays and “Chroma Key” for green‑screen effects.
- Keep Your Stream Key Secure – Store it in a password manager; avoid hard‑coding in OBS.
- Test Your Setup Before Going Live – Run a private stream to check quality and adjust settings as needed.
Frequently Asked Questions about best twitch obs settings for fast paced games
What is the minimum bitrate for streaming 720p60 on Twitch?
The recommended minimum bitrate is 4,000 kbps, ensuring smoothness without excessive buffering.
Can I use x264 encoding for fast paced games?
Yes, but it may increase CPU usage. GPU encoding (NVENC/AMD VCE) is preferable for high CPU loads.
Should I use a fixed FPS in-game for better OBS performance?
Yes, setting the game FPS to 60 aligns with OBS settings and reduces stutter.
How do I reduce latency between OBS and Twitch?
Enable “Low Latency” mode in OBS, use a wired connection, and avoid excessive compression.
What is the role of the keyframe interval in streaming?
A 2‑second interval meets Twitch’s requirements and helps maintain sync between audio and video.
Can I stream at 1440p60 on Twitch?
No, Twitch supports a maximum resolution of 1080p for live streams.
How do I monitor dropped frames in OBS?
Open the “Stats” window in OBS; a stable 60 fps with minimal drops indicates proper setup.
Should I use a separate microphone for gaming streams?
Yes, a dedicated mic reduces background noise and improves audio clarity.
Is it better to use a separate audio track for game audio?
Separating game and mic audio on different tracks allows easier post‑stream editing and mixing.
What should I do if my stream keeps stuttering?
Check CPU/GPU usage, reduce bitrate, or switch to GPU encoding. Ensure your internet upload speed meets the recommended thresholds.
Now that you have a comprehensive map of the best Twitch OBS settings for fast paced games, it’s time to put theory into practice. Take a moment to configure OBS with these parameters, run a test stream, and watch the smoothness and clarity boost your channel’s professional feel.
Share your results in the comments below and let us know which game you’re optimizing for. Happy streaming!

