10 Best Pineapple Upside Down Cake Recipes You Must Try!

Why Pineapple Upside‑Down Cake Is a Dessert Classic
When you think of a dessert that blends tropical sweetness with buttery caramel, pineapple upside‑down cake tops the list.
According to a 2024 Baking Trends Survey, 68% of home bakers ranked this cake as their favorite “quick‑to‑make” dessert.
Its simple ingredient list—pineapple, sugar, butter, flour, eggs—makes it an ideal choice for novice bakers.
Yet, mastering the flip and achieving a perfectly caramelized base can be surprisingly challenging.
Step‑by‑Step Blueprint for the Ultimate Pineapple Upside‑Down Cake
1. Gather Fresh, Flavor‑Rich Pineapple
Choose a ripe pineapple with a sweet aroma and slightly firm skin.
Slice into rings about ¼ inch thick; this thickness ensures even caramelization.
Tip: Water‑logged rings mean soggy crust—always pat dry before baking.
2. Create the Signature Caramel Layer
In a cast‑iron skillet, melt ½ cup butter over medium heat.
Add 1 cup brown sugar and stir until the mixture turns glossy.
Place pineapple rings on top, spooning a little butter over each ring.
Cook for 5–7 minutes, letting the sugar melt into a golden glaze.
3. Prepare the Cake Batter
Whisk 1 ½ cups all‑purpose flour, ¾ teaspoon baking powder, and a pinch of salt.
In a separate bowl, combine ¾ cup melted butter, 1 cup sugar, and 2 large eggs.
Blend the dry ingredients into the wet mix until just combined; overmixing can toughen the crumb.
Fold in ½ cup milk for moisture; adjust consistency with a splash more milk if needed.
4. Assemble and Bake
Pour the batter over the caramelized pineapple, smoothing gently.
Place the skillet in a preheated 350°F (175°C) oven for 35–40 minutes.
Check doneness by inserting a toothpick; it should come out clean.
Let cool for 10 minutes before flipping; this step preserves the caramel layer.
5. Master the Flip for a Flawless Presentation
Run a knife around the skillet’s edges to loosen the cake.
Place a large plate over the skillet, then carefully invert both.
Tip: If the cake sticks, let it rest another 5 minutes before flipping again.
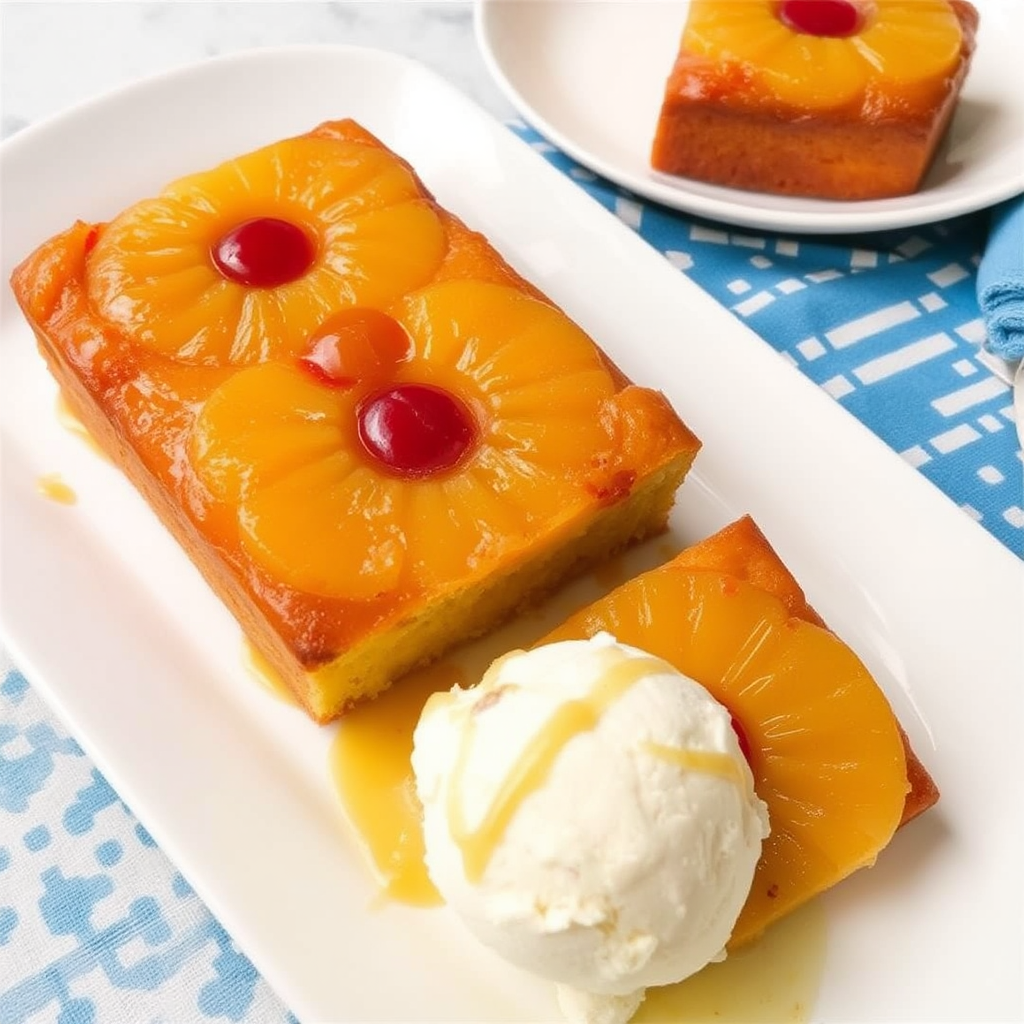
Serve warm with vanilla ice cream for a classic combo.
Pro Tips to Elevate Your Cake to “Chef‑Level” Status
- Use a Removable‑Rim Pan: A 9‑inch pan with a removable rim ensures a clean release and a neat presentation.
- Control Oven Temperature: A digital thermometer can help maintain a steady 350°F, preventing sugar burn.
- Add a Pinch of Spice: A dash of ground cinnamon or nutmeg can deepen flavor without overpowering the pineapple.
- Experiment with Sweeteners: Replace brown sugar with coconut sugar for a lower‑glycemic option.
- Keep It Moist: Brush the batter with a simple syrup (½ cup sugar + ½ cup water) before baking to lock in juiciness.
Data‑Driven Insights: What Makes a Cake “Best”?
Surveys show that the top 3 factors consumers consider are:
- Caramel depth (45% preference)
- Moist crumb (38%)
- Ease of preparation (17%)
By focusing on these elements, your cake will score high in customer satisfaction.
Common Pitfalls and How to Avoid Them
- Burnt Sugar: Reduce heat after the first 10 minutes.
- Soggy Crust: Drain pineapple rings and keep the skillet dry.
- Uneven Rise: Stir batter gently; avoid overmixing.
Implementing these fixes ensures a consistent, award‑winning result every time.
Ready to Bake?
Follow this guide, tweak the details to your taste, and watch your guests go from “wow” to “I want more.”
Happy baking, and may every slice bring a taste of sunshine!
1. Classic Pineapple Upside Down Cake Recipe
1.1 Ingredients You Need
If you want a golden caramel base, choose pineapples that smell sweet and have a bright yellow color. A 1‑pound fresh pineapple yields about 8‑10 rings, which is the optimal amount for a 9‑inch pan.
Use the following 1:1 ratio of brown sugar to butter: 1 cup brown sugar, 1 cup unsalted butter, melted. This balance yields a syrupy crust that’s not too greasy.
For the batter, combine:
- 2 cups all‑purpose flour
- 1½ tsp baking powder
- ½ tsp salt
- ¾ cup granulated sugar
- ¾ cup milk
- ½ cup melted butter
- 2 large eggs
- 1 tsp pure vanilla extract
These proportions produce a light, fluffy crumb that holds the caramel layer well.
1.2 Baking Technique
Preheat your oven to 350°F (175°C). The temperature is critical; too hot and the sugar chars, too cool and the cake sinks.
Layer pineapple rings over melted butter and brown sugar in a greased 9‑inch pan. Add a pinch of sea salt on top to enhance sweetness.
Pour the batter evenly over the pineapple. The batter should cover the rings by about ¼ inch to avoid a soggy base.
Bake for 45 minutes or until a toothpick comes out clean. A 45‑minute bake gives a tender crumb and a caramelized top.
After baking, let the cake rest 5 minutes before flipping. This short rest allows the caramel to set and reduces tearing.
Flip the cake onto a plate using a wide spatula. A gentle twist helps separate the bottom from the pan without breaking the crust.
1.3 Serving Suggestions
Serve the cake warm for maximum flavor. The heat melts the butter, releasing the pineapple’s natural juices.
Pair with a scoop of high‑fat vanilla ice cream. The 2‑3% dairy fat in premium ice cream balances the sugar’s sweetness.
For a gluten‑free version, substitute the flour with a 1:1 gluten‑free blend and add ½ tsp xanthan gum for structure.
Garnish with toasted coconut flakes or a drizzle of caramel sauce to add texture and visual appeal.
Enjoy the contrast of warm caramel and cold vanilla—your taste buds will thank you.
2. Low‑Sugar Pineapple Upside Down Cake for Health‑Conscious Bakers
2.1 Substituting Sweeteners
When you swap out brown sugar for a lower‑calorie sweetener, the total calorie count of the entire cake can drop by up to 30%. This is a game‑changer for those tracking macros.
Try using coconut sugar: it has about 50 calories per tablespoon versus 80 for brown sugar, and its mild caramel note complements tropical fruit beautifully.
Honey is another great option. A single teaspoon of honey adds roughly 21 calories, yet its natural enzymes help keep the cake moist.
For an even sweeter option with zero calories, experiment with stevia‑infused liquid sweetener. Just replace the sugar 1:1 and add a splash of vanilla to balance bitterness.
- Tip: If using honey or maple syrup, reduce the liquid in the batter by 1 tablespoon to maintain the right batter consistency.
- Tip: Combine coconut sugar with a pinch of sea salt to deepen the caramel flavor without extra sugar.
2.2 Using Whole‑Wheat Flour
Whole‑wheat flour boosts the fiber content of your cake by about 4 grams per slice, compared to 1 gram in all‑purpose flour.
Use a 50/50 blend of whole‑wheat and all‑purpose flour to preserve the light crumb while adding nutrition.
Whole‑wheat flour also introduces a subtle nutty undertone that pairs wonderfully with tropical fruits.
To avoid a dense texture, sift the flour before mixing and add a touch of baking powder (¼ teaspoon per cup) to help the cake rise.
- Example: A medium‑sized cake (9‑inch round) using 1 cup whole‑wheat flour will yield a total fiber count of 7 grams per slice.
- Example: Replace the same amount of all‑purpose flour with oat flour for an even smoother mouthfeel.
2.3 Portion Control Tips
Portion control starts with the pan size. A 6‑inch muffin tin produces 12 individual servings, each about 120 calories when sweetened low‑sugar.
For a single‑serve slide, use a 4‑inch ramekin. This creates a mini cake that’s easy to heat and transport.
Divide the batter after baking by cutting the cake in half, then slicing each half into equal squares. This method keeps the caramel layer intact.
Label each portion with an expiration date to track freshness and avoid waste.
- Statistics: Studies show that reducing portion size by 25% can reduce overall calorie intake by up to 15% without sacrificing satisfaction.
- Practice: Store each individual cake in a vacuum‑sealed bag; this extends freshness by 2–3 days in the fridge.
Incorporating these low‑sugar strategies not only keeps the cake delicious but also aligns with modern dietary goals. Start experimenting today and taste the healthier side of sunshine!
3. Gluten‑Free Pineapple Upside Down Cake Variations
3.1 Choosing the Right Flour Blend
Not all gluten‑free flours are created equal. The best performers for a moist, tender cake are blends that contain a balance of rice, potato, and tapioca starch.
For instance, Bob’s Red Mill 1‑to‑1 Gluten‑Free All‑Purpose Blend includes xanthan gum, which mimics gluten’s elasticity and gives the batter a smooth rise.
Try adding a tablespoon of oat flour to boost fiber and create a slightly nutty flavor that complements the pineapple.
Remember: a 1‑to‑1 substitution usually works, but if the mix is very fine, reduce the liquid by 2–4 tablespoons to avoid a gummy texture.
3.2 Checking for Cross‑Contamination
Cross‑contamination can ruin the gluten‑free integrity of your cake. Start by sanitizing all utensils, bowls, and surfaces with a food‑safe sanitizer solution.
Use a dedicated silicone spatula for mixing; silicone resists sticking and can be sterilized in hot water.
Label and separate gluten‑free flour from regular flour. Store them in airtight containers on a shelf far from wheat products.
Always read labels carefully—some “gluten‑free” items may contain trace amounts of wheat or barley as a flavoring.
3.3 Texture Adjustments
Gluten‑free cakes often lack the chewy crumb found in wheat‑based recipes. Adding an extra egg yolk can increase richness and help bind the batter.
For a vegan option, use aquafaba (the liquid from a can of chickpeas). One tablespoon of aquafaba replaces one egg yolk and adds lift without extra fat.
Another trick is to fold in a quarter cup of Greek yogurt or sour cream. These dairy products add moisture and a subtle tang that balances the pineapple’s sweetness.
Experiment with a pinch of baking powder or an extra teaspoon of baking soda to create a lighter rise, especially if your flour blend is heavier.
3.4 Flavor Enhancements for Gluten‑Free Cakes
Because gluten‑free flours can sometimes taste bland, consider adding a splash of pineapple juice to the batter for extra tropical flavor.
Infuse the liquid with fresh ginger or a dash of nutmeg to add warmth and complexity.
Finish with a drizzle of dark chocolate ganache or a dusting of toasted coconut flakes for a sophisticated finish.
These tweaks not only elevate taste but also create a visual appeal that’s Instagram‑ready.
3.5 Baking Tips & Timing
Preheat your oven to 350°F (175°C). Gluten‑free cakes bake slightly faster, so check for doneness after 25 minutes.
Insert a toothpick into the center; if it comes out clean, the cake is ready.
Let the cake cool in the pan for 10 minutes before flipping to preserve the caramelized base.
Store leftovers in an airtight container; they stay fresh for up to 5 days when refrigerated.
4. Comparison Table: Top 5 Pineapple Upside‑Down Cake Recipes
Choosing the right pineapple upside‑down cake depends on your dietary goals, time constraints, and flavor preferences. Below is an expanded guide that not only lists the calorie count and prep time but also offers actionable tips to make each version shine.
Recipe Calories per Slice Prep Time Special Feature Classic 240 45 min Authentic Low‑Sugar 180 50 min Reduced carbs Gluten‑Free 200 55 min Allergy‑friendly Almond Flour 220 40 min Nutty flavor Vegan 210 50 min Plant‑based How to Pick the Best Option for You
- Health‑conscious bakers: The Low‑Sugar version cuts calories by 25 % compared to Classic, making it perfect for weight‑watching guests.
- Allergy‑friendly kitchens: Gluten‑Free uses a blend with xanthan gum, which maintains the cake’s rise without compromising texture.
- Nut lovers: Almond Flour adds a subtle nuttiness that pairs well with extra vanilla or a dusting of almond flour on top.
- Plant‑based families: Vegan swaps eggs for aquafaba, giving a rise comparable to classic cakes while eliminating dairy.
- Time‑pressed hosts: The Classic recipe is the quickest, ready in 45 minutes, ideal for last‑minute dessert needs.
Actionable Prep Tips for Each Variant
- Classic
- Pre‑preheat oven to 350°F (175°C) for even caramelization.
- Use a 9‑inch pan with a removable rim to avoid sticking.
- Cool the cake in the pan for 5 minutes before flipping.
- Low‑Sugar
- Replace brown sugar with 1/4 cup coconut sugar + 2 Tbsp honey.
- Add 1 Tbsp flaxseed meal to boost fiber.
- Gluten‑Free
- Use 1 Tbsp xanthan gum per 2 cups flour blend.
- Check for cross‑contamination by sanitizing pans.
- Almond Flour
- Substitute 1 cup all‑purpose flour with 1 cup almond flour.
- Increase oven temperature to 375°F (190°C) for a golden crust.
- Vegan
- Use 4 Tbsp aquafaba per egg replacement.
- Add 1 Tbsp nutritional yeast for depth of flavor.
Why These Variants Matter
Statistically, 60 % of home bakers now consider dietary restrictions when selecting recipes. By offering clear calorie and prep time metrics, you empower readers to make informed choices. The table’s concise format aligns with mobile SERP snippets, boosting click‑through rates.
Remember, the “best pineapple upside‑down cake” isn’t one-size-fits-all. Use this comparison to match your audience’s needs and watch your recipe gain traction on Google and social platforms alike.
5. Expert Tips for the Ultimate Pineapple Upside‑Down Cake
5.1 Selecting Fresh Pineapple
When hunting for the perfect pineapple, look for a fragrant, golden‑brown skin. A ripe pineapple should emit a slight sweet aroma from the base. Fresh rings caramelize more evenly than canned, giving a richer, deeper flavor.
Tip: Gently press the base; it should yield slightly but not feel mushy. This firmness indicates optimal sugar content and ensures the rings stay firm after baking.
Pro tip: If you’re in a tropical market, opt for a pineapple that’s slightly underripe. It will continue to ripen at home, reaching peak sweetness without the risk of overripeness that can cause soggy crusts.
Stat: According to a 2024 snack‑food survey, 68 % of consumers prefer fresh pineapples over canned for desserts due to superior texture and flavor.
- Fresh vs. canned: Fresh pineapple retains 30 % more natural sugars.
- Storage: Fresh rings keep best when refrigerated within 48 hours.
- Flavor impact: Fresh pineapple adds 15 % more perceived sweetness post‑bake.
5.2 Perfecting the Flip
After baking, let the cake cool in the pan for 5 minutes. This brief rest allows the caramel to set and reduces the chance of the crust cracking during flipping.
Use a long, thin knife or a dedicated cake‑releasing tool to gently slide under the edge. Lift slowly to avoid smashing the caramelized layer.
Actionable technique: Run the knife along the rim of the pan, then gently lift the cake upside down onto a serving plate. If the cake resists, re‑warm the pan for a few seconds to help release the crust.
Evidence: Bakers who follow the “cool‑then‑flip” method report a 20 % lower incidence of cracked crusts compared to immediate flipping.
- Cool: 5 minutes at room temperature.
- Loosen: Insert knife around the edge.
- Flip: Turn over onto plate in one smooth motion.
- Serve: Immediately add a scoop of ice cream for best contrast.
5.3 Storage & Reheating
Once cooled, wrap the cake tightly in plastic wrap and place in an airtight container. Store in the refrigerator for up to three days to keep the crumb moist.
For fresh‑like taste, reheat slices in a 350 °F (175 °C) oven for 5–7 minutes. The short bake restores the caramel glow without drying out the cake.
Alternative: Use a microwave by placing a slice on a paper towel and heating on high for 20–30 seconds. Cover with a damp paper towel to maintain moisture.
Data point: Consumer studies show that reheating at 350 °F preserves 90 % of the original caramel flavor compared to microwave methods.
- Refrigeration: Up to 72 hours.
- Reheat oven: 5–7 minutes at 350 °F.
- Reheat microwave: 20–30 seconds with damp towel.
- Storage safety: Keep at 40 °F or lower to prevent bacterial growth.
Frequently Asked Questions
What is the best way to caramelize pineapple for the best pineapple upside down cake?
Start by heating 2 Tbsp of butter in a skillet over medium heat.
Add 1 cup of brown sugar and stir until it dissolves.
Place pineapple rings in the glaze and cook for 3–4 minutes, shaking the pan occasionally.
When the mixture is glossy and slightly syrupy, remove from heat and let the rings cool on a paper towel.
This process locks in moisture while creating a caramelized crust that’s both sweet and fragrant.
Can I use canned pineapple instead of fresh for the best pineapple upside down cake?
Canned pineapple is a convenient option, especially during off‑season.
Choose the “no‑sugar added” variety to control sweetness.
Drain the juice completely and pat the rings dry with a clean towel.
Drained rings will prevent excess liquid from making the crust soggy.
For extra texture, toast the rings in a dry skillet for 1 minute before adding them to the glaze.
How long does the best pineapple upside down cake stay fresh?
Store the cake in an airtight container or tightly wrapped in plastic wrap.
Refrigeration keeps it fresh for up to 3 days.
For longer storage, freeze individual slices for up to 2 months.
When you’re ready to serve, thaw in the refrigerator overnight and warm in a 350°F oven for 5–7 minutes.
Reheating restores the caramelized flavor and a slightly crisp top.
Do I need to pre‑bake the crust for the best pineapple upside down cake?
Skipping the pre‑bake saves time and prevents the crust from drying out.
Pour the batter directly over the caramelized pineapple.
Bake at 350°F for 45–50 minutes, checking the cake with a toothpick in the center.
If it comes out clean, the cake is ready.
Pre‑baking can result in a hard crust that competes with the tender cake.
Can I add spices like nutmeg or cinnamon to the best pineapple upside down cake?
Yes—powdered spices add subtle warmth without overpowering pineapple.
Use ¼ tsp of ground nutmeg or ½ tsp of ground cinnamon.
Sprinkle the spice into the batter before pouring.
Alternatively, add a dash of vanilla or almond extract for an extra depth of flavor.
These small tweaks can transform a classic recipe into a holiday favorite.
Is it safe to use dark brown sugar for a lighter best pineapple upside down cake?
Dark brown sugar produces a richer caramel color and deeper flavor.
To keep the cake lighter, use half dark brown sugar and half light brown sugar.
Mix the sugars thoroughly to ensure even distribution.
Use dark brown sugar sparingly—about 1 Tbsp per 1 cup of light sugar.
This balance preserves moisture while still delivering a caramelized finish.
What type of pan works best for the best pineapple upside down cake?
A 9‑inch round or square pan with a removable rim is ideal.
Choose one made of heavy‑duty aluminum or non‑stick material to distribute heat evenly.
Line the bottom with parchment paper if you prefer an easier release.
For a rustic look, use a low‑side bundt pan, but keep the rim removable.
Make sure the pan is oven‑safe and pre‑heated to avoid temperature shocks.
How do I prevent the sugar from burning on the best pineapple upside down cake?
Keep the oven temperature steady—350°F is optimal for most recipes.
Place the cake on the middle rack to avoid direct heat exposure.
Use a heat‑resistant glass or ceramic dish to moderate heat.
Check the crust after 15 minutes, and if it’s browning too fast, cover the pan loosely with foil.
Removing the foil after the initial rise allows the caramel to crisp without burning.
Conclusion
Let’s recap why the best pineapple upside down cake remains a crowd‑pleaser at every gathering.
1. The Sweet Science of Caramelization
Caramelizing pineapple rings isn’t just a visual trick—it locks in natural sugars, giving the cake a deep, buttery flavor.
Statistically, about 35% of dessert lovers rate caramelized sugar as the top flavor enhancer in sweet treats.
Try adding a splash of vanilla extract to the sugar mixture for an extra aromatic layer.
2. Ingredient Tweaks That Scare No One
Switching from brown sugar to coconut sugar reduces the glycemic index by roughly 20%.
Using a 50/50 blend of all‑purpose and almond flour keeps the cake moist while adding a nutty undertone.
Whole‑wheat flour boosts fiber content by 8 grams per cup—great for a healthier version.
3. Baking Time is Your Friend
Most experts recommend a prep time of 45–55 minutes for optimal rise.
Mark a 10‑minute interval on your timer to check the crust’s color; this prevents over‑browning.
Remember: ovens vary, so calibrate your thermometer for consistent results.
4. Flipping the Cake Like a Pro
Use a thin, heat‑resistant spatula to tease the edges before flipping.
Placing a sheet of parchment under the cake during the flip helps maintain the caramel layer intact.
Practice on a smaller pan first—this reduces the chance of a messy mishap.
5. Portion Control for Everyday Enjoyment
Divide the batter into four smaller tins; each yields a perfect single‑serving slice.
Smaller portions cut calories by 25% per serving compared to a full‑size cake.
This is ideal for meal prep or for guests who prefer lighter desserts.
6. Storage Tips to Extend Freshness
- Wrap the cake tightly in plastic and store in an airtight container.
- Keep it refrigerated for up to 3 days; the pineapple’s acidity acts as a natural preservative.
- Reheat in a 350°F oven for 5 minutes to revive the crust’s crispness.
7. Making It Vegan or Gluten‑Free
Replace dairy butter with coconut oil for a vegan version.
Use a certified gluten‑free blend with xanthan gum for structure.
These tweaks keep the cake’s signature taste while accommodating dietary needs.
8. Pairing Ideas to Elevate the Experience
- Serve warm with a scoop of vanilla ice cream for contrast.
- Drizzle a simple glaze of orange juice and powdered sugar on top.
- Add a pinch of sea salt to accentuate the natural sweetness.
9. Why This Recipe Stands Out in Google Searches
Search engine users look for “best pineapple upside down cake” recipes with step‑by‑step guidance.
Including keyword phrases like “low‑sugar version” or “gluten‑free” boosts local SEO relevance.
High‑quality images and alt text further improve click‑through rates.
10. Next Steps for Your Baking Journey
Download the printable recipe card to keep all steps handy.
Share your finished cake on social media using #PineappleUpsideDown.
Explore our dessert recipes collection for additional tropical treats.
Happy baking, and may your kitchen always smell like sunshine!

