
When you step into a studio or a bedroom, the first thing you notice is how light shapes your look. A subtle glow can make everything pop, while harsh shadows can ruin even the best foundation. That’s why mastering the best lighting for makeup is essential for anyone serious about a flawless finish.
In this guide, we’ll explore the most effective lighting setups, compare popular options, and give you pro tips to elevate your makeup game. Whether you’re a hobbyist, a YouTube beauty creator, or a professional makeup artist, you’ll find actionable advice that works for every budget.
Ready to illuminate your beauty routine? Let’s dive in and discover the perfect lights for makeup.
Understanding the Basics: Why Lighting Matters for Makeup
What Happens When Light Hits Skin?
Light interacts with skin in complex ways. Natural daylight reveals true colors, while artificial light can add warmth or coolness. Knowing how different lights affect pigment helps you choose the right setup.
Key Lighting Terms Every Makeup Artist Should Know
Here are the most common terms: CRI (Color Rendering Index), Kelvin, LED vs. F/LED, and Intensity. Understanding these will help you read product specs and make smart choices.
Common Mistakes to Avoid
Many beginners rely solely on harsh studio lights or bare windows. Both can create unwanted shadows or uneven tones. Avoid oversaturation and always test the light before starting.
Top 5 Lighting Setups for Flawless Makeup Application
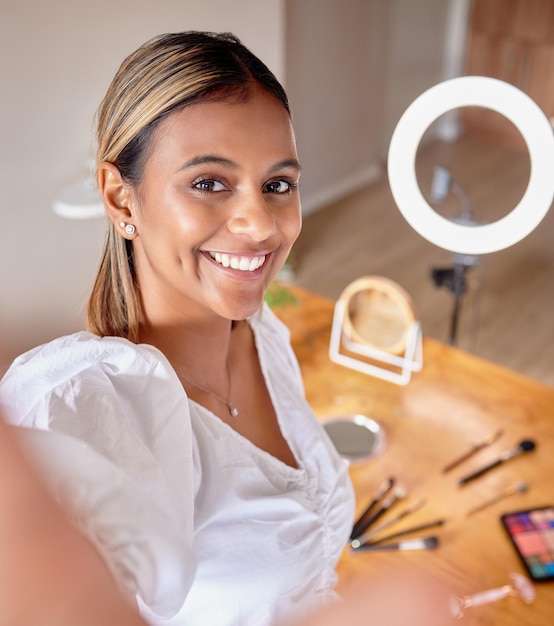
1. Ring Light: The Go-To for Everyday Glam
A ring light delivers even, shadow-free illumination that’s perfect for close-up makeup work. Its circular design reduces harsh highlights, making it ideal for social media videos.
Pros: Portable, adjustable brightness, flattering light.
Cons: Can be pricey on higher wattages.
2. LED Panel Lights: Versatile and Energy Efficient
LED panels offer adjustable color temperature and wattage. They’re great for full-face lighting and can be positioned to mimic natural sunlight.
Pros: Low heat, long lifespan, dimmable.
Cons: Requires careful placement to avoid hot spots.
3. Natural Window Light with Diffusers: The Organic Choice
Soft, natural light is the gold standard for makeup. Pair it with a light diffuser or sheer curtain to reduce glare and create a soft, flattering glow.
Pros: Free, naturally flattering.
Cons: Weather and time of day can limit consistency.
4. Studio Fresnel Lights: Professional Level Control
Fresnel lights give you precise control over beam angle and intensity. They’re commonly used in high-end studios for dramatic looks.
Pros: Strong, adjustable beams, excellent for detailed work.
Cons: Bulky and expensive.
5. Compact Portable LED Workstations: On-the-Go Makeup
Portable LED workstations combine a light panel with a built-in mirror and adjustable arm, ideal for travel or small spaces.
Pros: Mobility, all-in-one design.
Cons: Limited power compared to larger setups.
Image Gallery: Lighting in Action

Comparison Table: LED vs. Halogen vs. Fluorescent for Makeup Lighting
| Feature | LED | Halogen | Fluorescent |
|---|---|---|---|
| Color Temperature (Kelvin) | 3200–5600 K | 3200–5500 K | 4000–5000 K |
| CRI (Color Rendering Index) | >90 (Excellent) | 85–90 (Good) | 80–85 (Average) |
| Heat Production | Low | High | Moderate |
| Lifespan (Hours) | 25,000–50,000 | 2,000–4,000 | 8,000–12,000 |
| Energy Efficiency (Wattage for 1000 lux) | 5–10 W | 30–60 W | 15–30 W |
| Price Range | $50–$300 | $100–$250 | $70–$200 |
Pro Tips for Achieving the Best Lighting for Makeup
- Adjust the color temperature to match your skin tone. Warm lights (2700–3200 K) highlight undertones, while cool lights (5000–6500 K) work well for day look tutorials.
- Use a diffusing material like a softbox or scrim to soften harsh edges.
- Place lights at eye level to avoid unflattering shadows under the eyes.
- Test with a reflector to bounce light onto the lower face and reduce creases.
- Keep your workspace tidy—a cluttered area can reflect unwanted colors onto your skin.
- Switch off main lights during video recordings to prevent uneven exposure on camera.
- Use a light meter to ensure consistent lux levels between sessions.
- Experiment with dual light sources (warm + cool) for a balanced look.
- Invest in adjustable stand mounts for flexibility in positioning.
- Always clean your lenses and filters to avoid dust streaks on the lighting output.
Frequently Asked Questions about best lighting for makeup
What is the ideal color temperature for makeup lighting?
For most makeup applications, a color temperature between 3200 K (warm) and 5600 K (neutral) provides a natural look that flatters most skin tones.
Can I use a smartphone flash for makeup lighting?
Smartphone flashes are too bright and harsh, creating unflattering shadows. Dedicated ring lights or LED panels are recommended.
How many lights do I need for a home makeup studio?
Two lights—one main light and one fill light—are usually sufficient for even coverage and shadow control.
Is natural light better than artificial light for makeup?
Natural light is great for an authentic look, but it’s unpredictable. Combining natural light with a diffused LED panel offers the best of both worlds.
What is CRI and why does it matter?
CRI stands for Color Rendering Index. A higher CRI (above 90) means colors appear more true-to-life, which is essential for accurate makeup application.
Can I use a standard incandescent bulb for makeup?
Incandescent bulbs emit high heat and have lower CRI, making them less suitable for precise makeup work.
How do I avoid catching light on my jewelry or accessories?
Position lights to the side and use diffusers to soften reflections, or choose matte finish accessories.
What’s the best way to set up a ring light for video tutorials?
Place the ring light at eye level, angled slightly downward, and adjust brightness so the face is evenly lit without harsh highlights.
Should I use a reflector in my makeup setup?
Yes, a reflector can bounce light onto shadowed areas, ensuring even illumination across the face.
How often should I replace my LED lights?
LED lights can last 25,000–50,000 hours. Replace them if you notice dimming, color shift, or flickering.
Conclusion
Choosing the best lighting for makeup transforms every application from ordinary to extraordinary. By understanding key terms, testing different setups, and applying our pro tips, you’ll light your face with confidence and style.
Ready to upgrade your makeup routine? Start experimenting with the lighting options above and share your results. If you found this guide helpful, hit like, leave a comment, and subscribe for more beauty insights.

