
When the sky turns a living tapestry of green, purple, and blue, the urge to capture the moment is almost instinctual. However, the best camera settings for northern lights are not as simple as “shoot fast.” They involve a precise blend of exposure, focus, and timing that transforms fleeting light into unforgettable memories.
In this guide, we’ll walk through the exact camera settings—aperture, ISO, shutter speed, and more—that give you the sharpest, most vibrant aurora images. Whether you’re a hobbyist or a seasoned enthusiast, mastering these parameters turns night sky photography into a science and an art.
Why Camera Settings Matter for Aurora Photography
Unlike daytime landscapes where light is abundant, the aurora offers a unique challenge: it’s a low‑light, moving light source that can easily be overexposed or underexposed. The best camera settings for northern lights must balance three competing demands: detail, color accuracy, and motion capture.
Choosing incorrect ISO or shutter speed can wash out the subtle greens or freeze the beautiful flow of the aurora. Understanding how each setting interacts helps you create images that look natural and striking.
Setting 1: Aperture for Maximum Light Capture
Understand the Role of Aperture in Low‑Light Conditions
Aperture determines how much light enters the sensor. In low‑light photography, a wide aperture (small f‑number) is essential to gather more photons. For aurora shots, a DSLR or mirrorless camera with an aperture of f/2.8 or wider is ideal.
Using a fast lens also reduces the potential for blur caused by camera shake, especially when shooting with long exposure times.
Choosing the Right Lens for Aurora Photography
- Wide‑angle lenses (14‑24mm) capture more of the sky and create dramatic compositions.
- Prime lenses (35mm or 50mm) often have wider apertures and deliver sharper images.
- Avoid lenses with significant distortion unless you plan to crop the image later.
When selecting a lens, consider its maximum aperture and how it will affect depth of field in the night sky.
Practical Aperture Settings for Different Cameras
For full‑frame DSLRs, f/2.8 is a solid starting point. APS‑C or mirrorless sensors may allow slightly wider apertures, like f/2.0 on a Sony a7 series.
Always test your chosen aperture with a short exposure to ensure the image isn’t overexposed by bright clouds or street lights.
Setting 2: ISO – Balancing Signal and Noise
Understanding ISO in Low‑Light Photography
ISO controls the sensor’s sensitivity to light. Higher ISO values amplify both light and noise. The goal is to find the lowest ISO that still captures enough detail.
Most modern cameras perform well at ISO 800–1600 for aurora shots. Some newer models can handle ISO 3200 with minimal noise.
Noise Management Techniques
- Use in‑camera noise reduction settings to smooth high‑ISO images.
- Post‑process with software like Lightroom or DxO PhotoLab to denoise while preserving edges.
- Shoot in RAW to maximize post‑processing flexibility.
Remember that each stop of ISO roughly doubles the sensor’s sensitivity, but also doubles the noise level.
Best ISO Settings for Various Cameras
Full‑frame: ISO 800–1600. APS‑C: ISO 400–800. Mirrorless: ISO 800–3200 depending on model.
Use your camera’s “Auto ISO” feature to automatically adjust but set a maximum value to prevent noise spikes.
Setting 3: Shutter Speed – The Art of Long Exposure
Why Exposure Time Matters for Auroras
Long exposures capture more of the aurora’s soft light. However, too long a shutter can smear fast movements or create star trails.
Typical exposure times range from 10 to 30 seconds. For dramatic effect, feel free to experiment with 45–60 seconds if your tripod is stable enough.
Calculating Exposure Time with the Sunny 16 Rule
Start with the Sunny 16 Rule and adjust for darkness: if you’re shooting at full moon, reduce shutter by one stop.
Example: f/2.8 aperture, ISO 800 → 30-second exposure for a clear night.
Managing Noise and Star Trails
- Use interval shooting to avoid the “petal effect” from single long exposures.
- Post‑process to stack multiple images and reduce noise while preserving motion.
When in doubt, start with shorter exposures and gradually increase until the aurora appears just right.
Setting 4: Focus – Keeping the Sky Sharp
Manual Focus vs. Autofocus in Low Light
Most cameras struggle to lock focus in the dark. Switching to manual focus ensures the lens stays at infinity.
To set manual focus, use the camera’s live‑view magnification or focus peaking features.
Using a Light Source for Focusing
Point a flashlight or use a red‑light flashlight to bring the focus ring into view.
A quick focus check before each shot guarantees sharp star outlines and crisp auroral edges.
Tips for Consistent Focus
- Lock focus after setting to infinity, then keep the lens locked.
- Use a focus lock button if your camera has one.
- Re‑check focus if you change lenses or camera position.
Consistent focus eliminates the risk of blurry sky in your final images.
Setting 5: White Balance – Capturing Natural Aurora Colors
Choosing the Right White Balance Setting
The aurora’s colors shift from green to violet. A Custom white balance often yields the most accurate hues.
Set a custom white balance by pointing the camera at a neutral object (e.g., a white sheet) under the same light conditions.
Alternate White Balance Options
- Use Daylight for a slightly bright, natural look.
- Switch to Cloudy to warm up the greens.
- Experiment with Kelvin scale (e.g., 3500K) for creative control.
Test different settings in-camera to see which best matches the aurora’s mood.
Setting 6: Metering Mode – Avoiding Overexposure
Why Metering Matters in Aurora Photography
Metering determines how your camera reads light levels. Incorrect metering can wash out the sky.
Aurora scenes often benefit from Spot Metering, which focuses on a small area of the most luminous part of the aurora.
Alternative Metering Modes
- Center‑Weighted emphasizes the center of the frame.
- Multi‑Zone averages across the scene but may over‑expose bright clouds.
Using Manual Metering lets you set exposure directly, bypassing the camera’s light sensor.
Setting 7: Image Stabilization – Counteracting Vibration
The Role of Image Stabilization (IS)
When using long exposures, even subtle movements can blur an image. IS helps, but it’s not foolproof.
For most aurora work, a sturdy tripod is more reliable than in‑body stabilization.
Complementary Stabilization Techniques
- Use a remote shutter release to eliminate shake from pressing the button.
- Employ a bungee cord or spring to dampen vibrations from wind.
- Choose a tripod with a center column lock for extra stability.
Combining a stable tripod with a remote shutter gives the cleanest results.
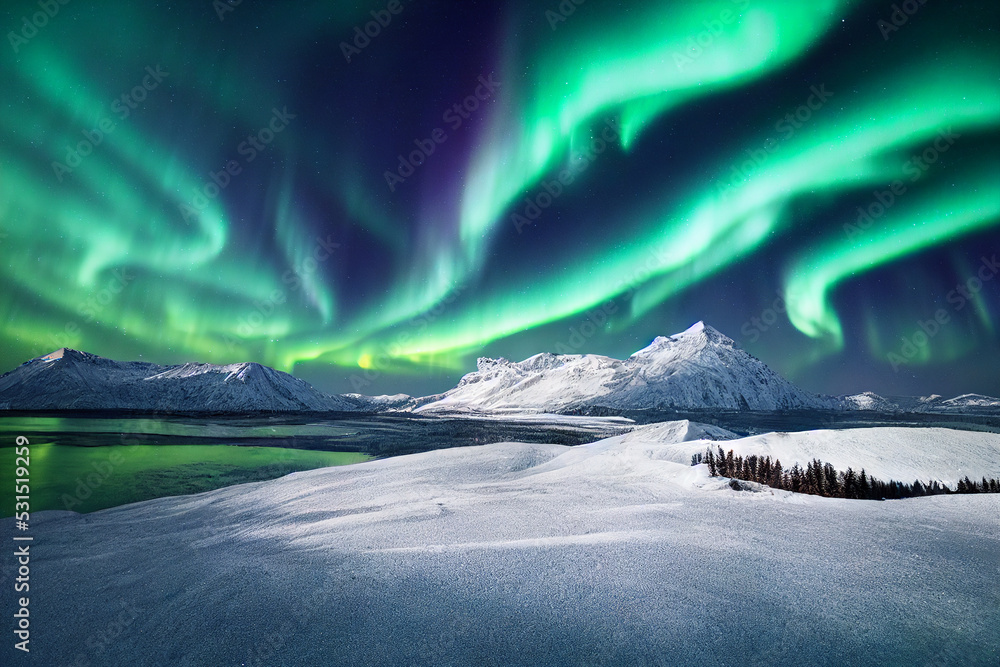
Image Placement
Below is an example of an aurora image captured with the best camera settings for northern lights: wide aperture, ISO 800, 20‑second exposure, manual focus, and custom white balance.
Comparison Table: Camera Settings for Aurora Photography
| Setting | Recommended Value | Why It Matters |
|---|---|---|
| Aperture | f/2.8 or wider | Maximizes light capture |
| ISO | 800–1600 | Balances sensitivity and noise |
| Shutter Speed | 10–30 s | Captures motion without smearing |
| Focus | manual, infinity | Prevents focus hunting in darkness |
| White Balance | Custom or Daylight | Preserves natural aurora hues |
| Metering | Spot or manual | Avoids overexposure of bright clouds |
| Stabilization | Tripod + remote shutter | Eliminates camera shake |
Expert Pro Tips for Aurora Photography
- Scout Locations Early – Check aurora forecasts and weather reports beforehand.
- Use Red Light Flashlights – Preserve night vision while adjusting focus.
- Pre‑set Your Settings – Lock in aperture, ISO, and white balance before you start.
- Shoot in RAW – Gives you maximum editing flexibility.
- Use a Night Light Meter to fine‑tune exposure.
- Experiment with different focal lengths to capture wide versus close‑up auroras.
- Always monitor battery life – Long exposures drain batteries quickly.
- Carry a spare lens filter for light pollution control.
Frequently Asked Questions about best camera settings for northern lights
What is the ideal ISO for aurora photography?
ISO 800–1600 works well on most cameras, balancing light sensitivity and noise.
How long should I let my shutter stay open?
10–30 seconds is typical. Longer exposures can blur fast aurora movements.
Do I need a special lens for shooting the northern lights?
A wide‑angle lens (14–24mm) is ideal, but any lens with a fast aperture will work.
Can I use autofocus in low light?
Autofocus often fails. Switch to manual focus and lock at infinity.
What white balance gives the most natural colors?
Custom white balance or Daylight settings typically produce the best results.
Should I use image stabilization?
Stabilization helps, but a sturdy tripod and remote shutter are more reliable for long exposures.
How can I reduce noise when shooting at high ISO?
Use in‑camera noise reduction, shoot in RAW, and denoise in post‑processing.
What should I do if my sky is overexposed?
Switch to spot metering or lower your ISO and use a shorter exposure.
Is it better to shoot in RAW or JPEG?
RAW offers maximum flexibility for post‑processing and is recommended for aurora photography.
Can I add other light sources to my scene?
Yes, but use a red‑light flashlight for focusing to preserve night vision.
Conclusion
Capturing the northern lights is both an art and a science. By mastering the best camera settings for northern lights—aperture, ISO, shutter speed, focus, white balance, metering, and stabilization—you’ll consistently produce images that resonate with viewers. Practice, patience, and a solid understanding of each parameter will transform your aurora photography from good to unforgettable.
Ready to hit the Arctic skies? Grab your camera, set your tripod, and let the aurora light up your portfolio. Happy shooting!

