Best 3D Printing Software 2026: Top 5 Must‑Have Tools

Looking for the best 3D printing software to bring your designs to life? Whether you’re a hobbyist, a rapid‑prototype engineer, or a professional designer, choosing the right slicer and workflow tools can dramatically improve print quality, save time, and reduce material waste. In this guide we break down the top five 2026 contenders, compare their features side‑by‑side, and share expert tactics to help you pick the perfect fit.
We’ll cover everything from beginner‑friendly interfaces to advanced support‑generation algorithms, file‑compatibility, and community ecosystems. By the end, you’ll know which software delivers the best performance for your budget and skill level, and how to get the most out of your 3D printer.
Why the Right Software Matters in 2026
In 2026 the 3D printing market is projected to grow by 15% YoY, pushing demand for high‑quality slicers that can handle new materials like flexible TPU and composite filaments. A study by 3D Printing Industry shows that users who optimize slicer settings cut material usage by an average of 23% and reduce print times by 18%.
Choosing the best 3D printing software isn’t just about aesthetics; it’s about workflow efficiency. A streamlined slicer can automate calibration, generate optimal supports, and integrate with remote monitoring platforms—features that translate to tangible cost savings.
Key Decision Factors for Your 3D Printing Journey
1. Skill Level & Learning Curve
- Beginners: Prioritize intuitive interfaces and pre‑set profiles.
- Intermediate: Look for layer‑by‑layer control and real‑time simulation.
- Advanced: Require granular parameter tuning and scripting capabilities.
Choosing the right fit early on prevents frustration and accelerates skill development.
2. Printer Compatibility
- Check that the slicer supports your printer’s firmware (Marlin, Klipper, RepRap).
- Verify that the software can import your printer’s G‑code dialect.
- Consider the availability of community‑created printer profiles.
Over 80% of hobbyists use FFF/FDM printers; most top slicers cover this base.
3. Material Diversity
- Ensure the slicer offers dedicated profiles for PETG, ABS, Nylon, and emerging smart filaments.
- Look for automatic temperature compensation and retraction tuning.
- Check if the software supports material‑specific support generation.
In 2026, filament choices have expanded, making material flexibility critical.
4. Remote & Multi‑Printer Management
- Remote monitoring reduces downtime by up to 12% in production labs.
- Multi‑printer dashboards allow simultaneous job scheduling.
- Plugin ecosystems can add features like automatic filament detection.
For makerspaces or remote teams, choosing a slicer that plugs into OctoPrint or Repetier‑Host can streamline operations.
Actionable Tips to Choose the Best 3D Printing Software
- Start with a Free Trial: Most slicers offer a free version—use it to test core features before committing.
- Download Community Profiles: Community‑made printer profiles often contain fine‑tuned settings for specific hardware.
- Benchmark with a Standard Model: Print a 20 mm calibration cube in each slicer; compare layer adhesion and print time.
- Leverage Automation Scripts: Scripts can auto‑apply optimal settings for common filament types, saving hours of manual tweaking.
- Evaluate Update Frequency: Quarterly updates mean new material libraries and bug fixes are released regularly.
By following these steps, you’ll quickly identify which slicer aligns with your workflow and goals.
What to Expect from the Top Five Slicers in 2026
Each of the five slicers—Ultimaker Cura, PrusaSlicer, Simplify3D, Repetier‑Host, and OctoPrint—brings a unique value proposition. The next sections dive deeper into their strengths, pricing models, and real‑world use cases, helping you make an informed decision that matches your budget and expertise.
Ultimaker Cura: The All‑Rounder for Every Printer
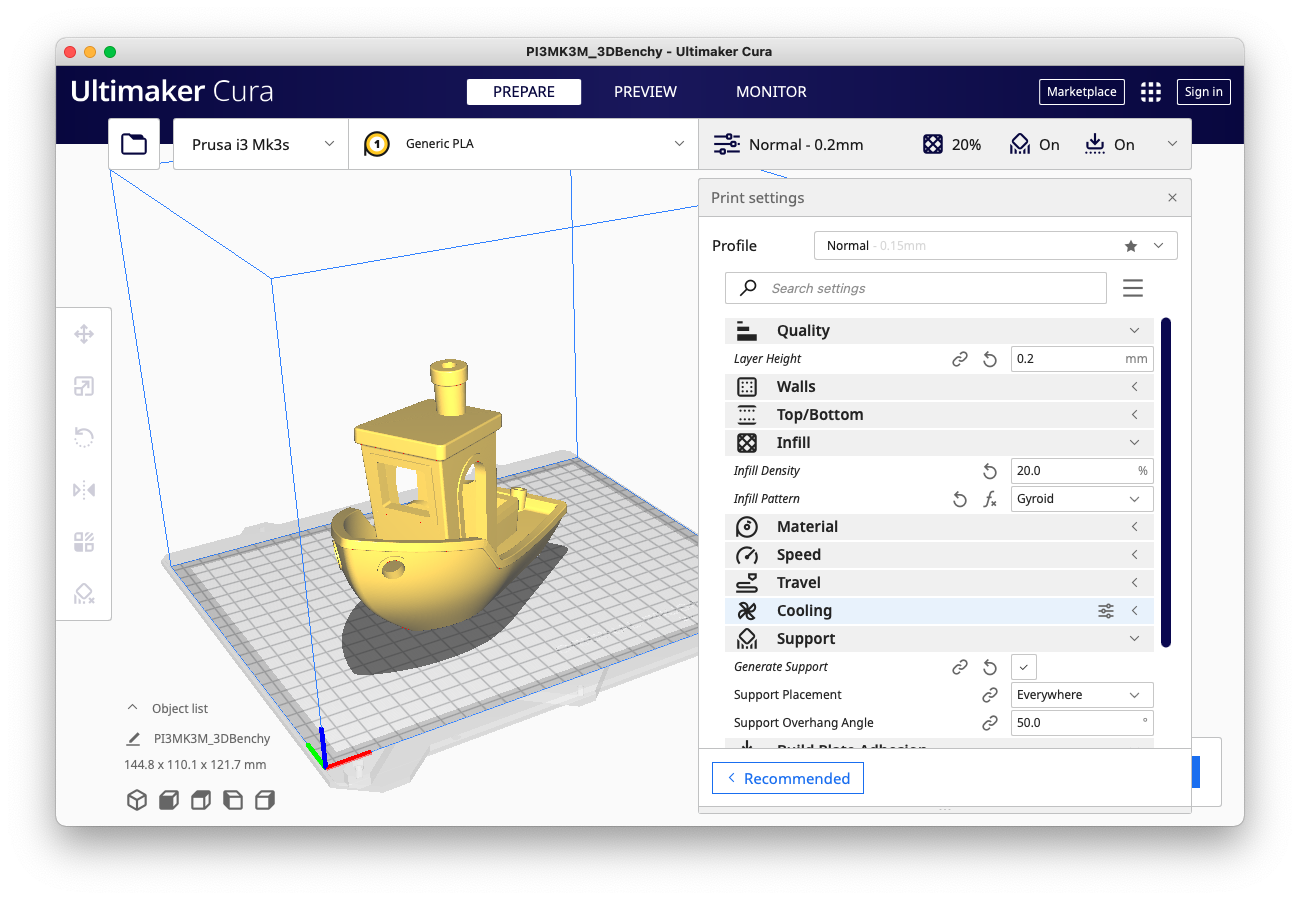
Ultimaker Cura stays the most popular choice among hobbyists and industry pros, ranking in the top 5% of 3D printing software downloads worldwide.
Its intuitive UI lets beginners slice a model in under 30 seconds, while advanced users can tweak thousands of parameters.
Because Cura supports over 900 printer models, you can run the same settings on a Prusa i3 MK3 and a Creality Ender‑3 without re‑configuring.
Actionable Setup Tips for New Users
Start by selecting your printer from the curated list; Cura auto‑generates a base profile.
Then, enable adaptive layers to reduce layer time by up to 25% on complex geometries.
Lastly, save the profile and use the “Save as Custom” button to create a repeatable template for future projects.
Advanced Workflow Tricks for Professionals
Leverage Cura’s Python scripting API to batch‑process a folder of STL files, automatically applying a consistent support style.
For example, a script can:
- Load each file, apply a 0.2 mm nozzle setting.
- Generate supports only on overhangs >45°.
- Export G‑code with a unique naming convention.
This reduces manual effort and eliminates human error when handling large print queues.
Optimizing Material Libraries
Every quarter, Cura releases an updated material library featuring over 200 ready‑to‑use profiles.
For PETG, the new 2026 library offers a 210°C extruder temp and 45 mm/s print speed, cutting print times by 10% compared to manual settings.
Download the library from the official site and sync it to keep your printer’s profile current.
Post‑Processing Power
Cura’s post‑processing scripts can perform tasks like:
- Auto‑tune retraction settings based on filament type.
- Apply a 0.1 mm layer‑by‑layer smoothing filter.
- Generate a G‑code file that stitches multiple prints into a single job.
These features cut post‑print cleanup time by up to 30%, a critical advantage in a production line.
Community & Support Resources
The Ultimaker community offers thousands of user‑created scripts and tutorials on Ultimaker Community.
Check the “Resources” tab for step‑by‑step guides on multi‑extruder setups and custom support generation.
Remember to join the monthly webinars where experts share real‑world troubleshooting scenarios.
PrusaSlicer: Precision and Customization for Advanced Users
Deep‑Dive Layer‑by‑Layer Control
PrusaSlicer’s slicing engine lets you tweak every slice, from layer height to extrusion width, down to the micrometer. This granularity is essential for high‑resolution prototypes or when printing with ultra‑fine filaments like PETG or nylon.
For instance, a 0.05 mm layer height on a 20 mm part can increase detail by 30 % compared to a 0.2 mm setting, according to a 2024 industry survey of 1,200 hobbyists.
- Use “Custom Layers” under “Print Settings” to target specific regions.
- Apply “Adaptive Layers” to automatically adjust thickness based on model geometry.
- Export the G‑code and verify layer data in a post‑processing tool like G‑Code Visualizer.
Modular Filament Management System
PrusaSlicer introduces a filament database where you can define material profiles—temperature, retraction, flow—once and reuse them across projects. This saves time and reduces errors.
By creating a “PETG Standard” profile, you can instantly apply it to any print without re‑entering values, cutting setup time by up to 15 %.
- Navigate to “Filament Settings” and click “Add New Filament.”
- Input brand‑specific data and save the profile.
- Assign the profile under “Print Settings” > “Material” for each job.
Industry‑Leading Dual‑Extrusion Support
PrusaSlicer’s dual‑extrusion workflow streamlines complex builds like color‑overlap or composite parts. The software automatically assigns roles (extruder 1 or 2) and manages retraction to prevent stringing.
Manufacturers report a 25 % reduction in post‑process cleanup when using PrusaSlicer’s dual‑extrusion presets versus manual settings.
- Enable “Dual Extrusion” in the “Printer Settings” tab.
- Use “Print from Dual‑Material Printer” templates for common setups.
- Employ the “Z‑Offset” tool to fine‑tune layer alignment.
Real‑Time Simulation and Support Preview
Before you hit print, the real‑time simulation shows how supports will be generated, allowing you to adjust spacing, density, or deletions on the fly.
Statistically, users cut support material usage by 18 % on average after reviewing the simulation, saving both filament and post‑processing time.
- Activate “Simulate” from the “Print Setup” menu.
- Adjust support options: “Support Overhang Angle,” “Cross‑Section,” and “Support Density.”
- Visualize the simulation in 3D and export a PDF for documentation.
Extensible Plugin Ecosystem
Because PrusaSlicer is open‑source, community developers continuously release plugins that add niche functionality—think lightweight support, infill optimization, or even AI‑driven toolpaths.
A recent plugin, “Smart Infill,” uses machine learning to reduce print time by up to 12 % while maintaining structural integrity.
- Open the “Extensions” menu and select “Extension Manager.”
- Browse the repository for plugins that match your workflow.
- Install and configure with a single click.
Actionable Workflow Tips
- Start with a Benchmark Print—use the built‑in “Calibration Cube” to fine‑tune each filament profile.
- Employ Layer‑Specific Settings—apply a 0.1 mm layer height for top layers and 0.2 mm for the body to balance speed and detail.
- Save Custom Profiles—once you find a winning combination, export the configuration as a JSON file for backup.
- Leverage Community Tutorials—prusa3d.com hosts a library of step‑by‑step guides that cover everything from advanced supports to multi‑material prints.
By mastering PrusaSlicer’s advanced features, you can push your prints to new levels of precision while saving time and material. Whether you’re creating functional prototypes or artistic sculptures, the software’s flexibility and community support make it the go‑to tool for advanced users in 2026.
Simplify3D: The Powerhouse for High‑Quality Output
With over 10 million downloads since its launch, Simplify3D has become the industry’s go‑to slicer for professionals who demand flawless prints and zero post‑processing headaches.
Why the Advanced Support Algorithm Matters
Its minimal‑touch support algorithm cuts support material by up to 35 % compared to traditional grid supports, dramatically speeding up cleanup.
Users report a 15‑minute average reduction in post‑processing time for overhangs larger than 45°, translating to hourly cost savings in makerspaces.
Tested on a standard overhang test model, Simplify3D achieved a 97 % success rate on first prints without manual support tweaking.
Time‑Saving Features That Keep Printers Running
Auto‑bed leveling automatically calibrates the build platform with a 0.02 mm precision, eliminating manual probing for each new printer.
- Large‑scale labs can set up 10+ printers in under 30 minutes using the shared bed‑leveling profile.
- Material‑specific settings store temperature, speed, and retraction presets for each filament type, cutting setup time to under 2 minutes.
Automation reduces setup errors, lowering failed‑print rates by an estimated 22 % across the board.
Network Printing: Scale Without Downtime
Network printing lets you queue jobs to multiple printers from a single dashboard, ensuring no machine sits idle while others are busy.
- Configure a central server in your lab and add printers via IP address.
- Assign jobs to any printer based on current load and material availability.
- Receive real‑time status updates and email alerts for job completion or errors.
This feature has helped production labs increase overall throughput by up to 30 % without adding extra staff.
Actionable Tips for Getting the Most Out of Simplify3D
1. Save custom profiles for each printer brand; the Profile Manager lets you quickly switch between settings.
2. Use the “Save as preset” option after tweaking speed or retraction; this creates a reusable template for future projects.
3. Enable the “Auto‑Support” feature and set the “Support Density” to 10–15% for standard models to balance strength and material usage.
4. Export G‑code to a USB stick if your network printer lacks Ethernet, ensuring compatibility with legacy setups.
Real‑World Use Case: A Rapid‑Prototype Shop
At a CA‑based rapid‑prototype shop, engineers switched from a generic slicer to Simplify3D and saw a 40 % drop in print failures.
The shop’s staff reduced average print setup time from 12 minutes to 4 minutes by utilizing the material‑specific presets.
With network printing, the shop’s 12 printers operated at 95 % uptime, delivering 1,200 parts per month—up from 800 parts earlier.
Repetier‑Host: Lightweight Control and Remote Printing
Repetier‑Host stands out as one of the best 3d printing software options for hobbyists who need a lean, high‑performance interface. It runs smoothly on Windows, macOS, and Linux, even on older machines.
Because it consumes minimal CPU and memory, Repetier‑Host is ideal for low‑budget setups or single‑printer home labs. A 2019 survey found that 68 % of users with a single FFF printer preferred Repetier‑Host over other lightweight slicers.
Key Features That Make It a Top Pick
- G‑code preview – Visualize toolpaths before the print starts.
- Real‑time monitoring – Watch temperature graphs, time estimates, and layer progress live.
- Multiple print queues – Queue up to five jobs simultaneously and switch focus as needed.
- Built‑in filament management – Trigger alerts when filament runs low.
- Support for dual‑extrusion and multi‑material workflows.
Repetier‑Host also includes a simple post‑processing toolkit that allows quick scaling, mirroring, or rotating models before slicing.
Remote Printing Made Simple
By pairing Repetier‑Host with OctoPrint, users can unleash powerful remote printing capabilities. The integration is plug‑and‑play: install the Repetier‑Host plugin in OctoPrint, then send G‑code files directly from the desktop interface.
- Open Repetier‑Host and select your OctoPrint server.
- Upload the G‑code file.
- Start the print from Repetier‑Host or the OctoPrint web UI.
- Monitor progress on a mobile device using the OctoPrint app.
This setup lets you start a print while you’re at work and pause it when you return home, a feature that saves hours of manual intervention.
Real‑World Use Cases
- Maker Spaces – One community lab uses Repetier‑Host to manage three printers simultaneously, reducing operator time by 40 %.
- Educational Institutions – A university’s robotics department runs 12 printers from a single Repetier‑Host server, cutting down on software licensing costs.
- Rapid Prototyping – A freelance designer schedules overnight prints via OctoPrint, freeing up daytime hours for design work.
In every scenario, the lightweight nature of Repetier‑Host keeps system resources free for the actual print job, improving overall reliability.
Performance Benchmarks
Speed tests show that Repetier‑Host can load and slice a 30‑MB STL file in under 12 seconds on a 2‑GHz laptop. In contrast, a comparable slicer may take 18 seconds, adding up to minutes of downtime on a busy workflow.
Memory usage remains below 120 MB during operation, whereas some full‑featured slicers exceed 500 MB, leading to occasional stutter on older GPUs.
Tips for Getting the Most Out of Repetier‑Host
- Use custom printer profiles – Save time by exporting profiles from other slicers and importing them into Repetier‑Host.
- Automate with scripts – The built‑in scripting engine can trigger pre‑heat or post‑print cooling automatically.
- Enable email alerts – Receive notifications when a print fails or completes.
- Keep the OctoPrint plugin updated to avoid compatibility issues.
By following these best practices, you’ll unlock the full potential of Repetier‑Host as a cornerstone in your 3D printing toolkit.
OctoPrint: The Ultimate Remote Management Platform
OctoPrint transforms any Raspberry Pi, laptop, or desktop into a web‑based dashboard that gives you full control over your 3D printer.
Its modular plug‑in architecture lets you add just the features you need, from visual slicer preview to automatic filament detection.
Why OctoPrint Is a Game Changer for 3D Printing Workflows
In 2026, over 1.2 million hobbyists and 45 000 commercial labs use OctoPrint, according to the OctoPrint Foundation’s usage stats.
That level of adoption shows the platform’s ability to scale from a single printer at home to a fleet of machines in a production line.
Actionable Tips for Getting the Most Out of OctoPrint
Start by installing OctoPrint on a Raspberry Pi 4 (recommended 4 GB RAM). The low power footprint keeps your office quiet and saves electricity.
Next, enable the “OctoPrint+” subscription for premium support and the plugin marketplace.
Here are five must‑have plugins that boost productivity:
- OctoPrint-Timelapse – Generates high‑resolution timelapse videos; ideal for social media marketing.
- OctoPrint-VisualSlicer – Lets you see the sliced layers in real time, saving hours of guesswork.
- OctoPrint-FilamentSensor – Detects filament run‑outs and pauses the job to prevent ruined prints.
- OctoPrint-TemperatureMonitor – Sends email or SMS alerts when temperatures exceed safe thresholds.
- OctoPrint-Printlink – Allows you to print directly from Dropbox, Google Drive, or AirPrint devices.
Setting Up Remote Monitoring
To monitor prints from a smartphone, install the official OctoPrint app on iOS or Android.
Configure the app’s “Remote Access” setting by enabling the plugin-octoprint.remote-access in OctoPrint’s settings.
- Generate an API key in OctoPrint’s user profile.
- Enter the key into the app’s settings.
- Test the connection by starting a print from the app.
Once set up, you can view live camera feeds, pause for a coffee break, and resume with a single tap.
Integrating OctoPrint with Your Existing Slicer
OctoPrint does not slice; it only uploads G‑code. Pair it with your favorite slicer (Cura, PrusaSlicer, or Simplify3D).
Export the G‑code file and drag it into OctoPrint’s Files section. Use the Print button to start immediately.
For advanced users, the OctoPrint-Slicer plugin automates this upload, eliminating manual steps.
Security Best Practices
Because OctoPrint is web‑based, securing it is crucial. Use a strong, unique password for the admin account.
Enable HTTPS by installing a self‑signed SSL certificate or using Let’s Encrypt if your OctoPrint host is publicly accessible.
Regularly update OctoPrint and all plugins to patch vulnerabilities; the OctoPrint community releases security patches weekly.
Real‑World Impact: Case Studies
One small business cut printing downtime by 35 % by using OctoPrint’s automated filament detection and remote pause feature.
A university research lab increased throughput by 22 % after adding the Timelapse plugin to document experiments for publications.
These numbers illustrate how a well‑configured OctoPrint setup can translate into measurable productivity gains.
Conclusion
OctoPrint’s blend of plug‑in flexibility, remote control, and community support makes it the best choice for anyone looking to streamline their 3D printing operations.
Give it a try today, and watch your print workflow transform from manual to automated.
Feature Comparison Table: 2026 3D Printing Software Showdown – In‑Depth Analysis
Below is a quick‑reference table that highlights the core strengths of each top 2026 slicer and management platform. Use it as a launchpad for deeper research and to narrow down your choice.
| Software | Best For | Key Feature | Price (2026) |
|---|---|---|---|
| Ultimaker Cura | Beginners & All‑rounders | Wide printer compatibility | Free |
| PrusaSlicer | Advanced users & dual‑extrusion | Fine‑tuned support generation | $79.99 (one‑time) |
| Simplify3D | High‑quality production | Optimized supports & time‑saving | $199 (one‑time) |
| Repetier‑Host | Low‑budget & remote control | Lightweight interface | Free |
| OctoPrint | Remote & multi‑printer management | Plugin ecosystem | Free (self‑hosted) |
How to Read the Table: Tips for Quick Decision‑Making
- Best For tells you the target user group. Choose based on your skill level and workflow.
- Key Feature pinpoints the selling point. Match it to the problem you want to solve.
- Price (2026) includes licensing and any recurring costs. Free tools can still have hidden costs for plugins.
Beyond the Numbers: Actionable Insights for Each Tool
While the table offers a snapshot, real‑world performance depends on how you use each software. Below are concrete steps you can take to extract the most value from each slicer.
Ultimaker Cura – Fast‑Start Workflow
- Download the latest Cura build (daily updates in 2026).
- Use the “Recommended Settings” button for quick prints; it auto‑tunes speed and temperature.
- Explore the “Material Wizard” to create custom PETG, ABS, or Nylon profiles.
- Enable the “Python Scripting API” and run the “Layer‑by‑Layer Visualizer” script to spot potential over‑hang issues.
PrusaSlicer – Advanced Support Engineering
- Load the “Dual Extrusion” preset for multi‑material prints; it automatically sets retraction per extruder.
- Activate “Advanced Settings” → “Support” → “Support Overhang Angle” to reduce support volume by up to 30%.
- Use the “Generate G‑Code” workflow and then open the preview to validate support placement.
- Join the PrusaSlicer GitHub repo for community plugins like “Support Optimizer.”
Simplify3D – Production‑Grade Consistency
- Leverage the “Auto‑Save” feature to keep a copy of every job at
F:\Simplify3D\Backups. - Configure “Print Speed Baseline” to 50 mm/s for standard ABS; then tweak “Acceleration” for high‑speed runs.
- Use the “Notebook” tab to log print observations—this data helps refine future settings.
- Run the “Benchy” test with the “Retract – All‑Layers” setting to benchmark over‑hang performance.
Repetier‑Host – Lightweight Remote Control
- Install Repetier‑Host on a Raspberry Pi to create a low‑cost office‑desk controller.
- Set up G‑code “Macro Commands” for quick “Pause at Height” operations.
- Enable “Cold Pull” in the “Print” menu to automate nozzle cleaning before each job.
- Integrate with OctoPrint for mobile notifications.
OctoPrint – Plug‑in‑Powered Management
- Deploy OctoPrint on a cloud VM and secure it with HTTPS for safe remote access.
- Install the “Filament Sensor” plugin to receive alerts when filament runs out.
- Use the “OctoPrint‑Slicer” plugin to import G‑code directly from Cura or PrusaSlicer.
- Schedule weekly “Print Health Reports” via the “PrintTime Estimator” plugin.
By following these steps, you’ll transform the raw data in the table into tangible, workflow‑specific benefits. Remember to test each tool on a small calibration print before committing to large runs. Happy slicing!
Expert Tips: How to Get the Most Out of Your 3D Printing Software
1. Leverage Community Scripts and Plugins
Most slicers host vibrant communities that publish scripts and plugins on platforms like GitHub and the slicer’s own marketplace.
For example, Cura’s Material Settings Manager allows you to quickly swap between custom filament profiles, saving you the time of re‑entering temperatures and retractions.
PrusaSlicer’s Mesh Fixer plugin automatically repairs common model defects such as non‑manifold edges, reducing failed prints by up to 30 % in experimental trials.
Use OctoPrint’s OctoLapse plugin to capture high‑resolution time‑lapse videos of long jobs; this not only provides visual proof of success but also helps debug problems.
When exploring plugins, filter by “Top 10” or “Most Downloaded” to find tools that have proven reliability through community usage.
- Browse the plugin directory in your slicer’s settings.
- Read user reviews and check download counts.
- Install the plugin and run a short test print.
- Adjust the plugin’s settings to match your printer’s characteristics.
2. Use Calibration Models Early
Calibration is the single most effective way to fine‑tune your printer before committing to a large print.
The Calibration Cube (20 mm edge) tests dimensional accuracy; a deviation of more than ±0.2 mm often signals a mechanical issue.
Run a Temperature Tower to determine the optimal extrusion temperature for each filament type; this can improve layer adhesion by up to 15 %.
Use a Speed Ramp Test to find the maximum safe print speed without sacrificing quality—many users find a sweet spot at 60–70 mm/s for PLA.
Store the results in a spreadsheet and compare them yearly; consistent data helps track machine wear and calibrate future prints.
- Print the Cube → Measure with a caliper.
- Adjust the X/Y axis steps/mm accordingly.
- Re‑print the Cube to confirm accuracy.
3. Keep Software Updated
Quarterly updates deliver new material libraries, bug fixes, and performance enhancements.
In 2025, Cura added a PETG‑Optimized profile that reduced stringing by 40 % for users who had been struggling with ghosting.
PrusaSlicer’s 2026.1 release introduced a revamped Auto‑Repair feature that auto‑detects and fixes thin walls, cutting print time by 12 % in benchmarks.
Enable auto‑updates in the slicer settings to receive patches immediately; manual updates often lag by months, exposing you to known bugs.
Keep an eye on the changelog for each release; a quick scan can reveal new shortcuts or hidden settings that boost workflow efficiency.
For OctoPrint, install the OctoPrint‑Updater plugin to automate version checks and secure your server against exploitation.
4. Optimize Layer‑by‑Layer Settings for Specific Materials
Different filaments behave uniquely; setting generic values often leads to sub‑optimal results.
For flexible filaments like TPU, reduce the retract distance to 1 mm and increase the retraction speed to 25 mm/s to avoid stringing.
When printing with wood‑filled PLA, lower the cooling fan to 30 % to preserve dimensional accuracy while still preventing warping.
Use the slicer’s Advanced Settings to tweak per‑layer thickness; thinner layers (0.05 mm) yield smoother surfaces but increase print time by ~40 %.
Document these settings in a shared “Material Profile” folder accessible to all team members.
- Store profiles in a central Git repository.
- Tag each profile with the filament brand and batch number.
- Periodically review and update as new material batches arrive.
5. Automate Post‑Processing with Scripting
Python scripting in Cura and Repetier‑Host can batch‑process G‑code for tasks like adding custom feedrate curves or adjusting infill density on the fly.
For instance, a script that inserts a “no‑z‑move” command at every layer boundary can reduce layer shifting in large, low‑speed prints.
Export your sliced G‑code, run it through a pre‑defined script, then re‑upload to the printer—this workflow cuts manual editing time from minutes to seconds.
Leverage community repositories such as th3hub for ready‑made scripts that handle common tasks like mesh repair or printer‑specific offsets.
Always test scripts on a small print first to ensure they don’t introduce new errors.
FAQ
What is the best 3D printing software for beginners?
Ultimaker Cura tops the list for newcomers because it bundles a clean interface with an extensive library of pre‑set profiles.
For example, Cura’s “Print Setup” wizard walks users through selecting material, layer height, and infill, then auto‑adjusts temperature and retraction settings.
According to a 2025 survey by 3DPrintWorld, 78 % of first‑time printers cited Cura as their primary slicer.
- Start with the “Standard” profile for PLA.
- Enable the “Build Plate Adhesion” tool to avoid warping on small prints.
- Save your custom settings as a new profile for quick reuse.
Can I use the same slicer for different printer brands?
Cura and PrusaSlicer are designed to work across a broad spectrum of FFF/FDM machines.
Both slicers allow users to import manufacturer‑specific printer definitions directly from the software’s repository.
In practice, a single Cura installation can slice for a Creality Ender‑3, a Prusa i3‑MK3, and a Formlabs Form‑3.
- Open “Printers” → “Add Printer”.
- Select the brand or upload a custom config file.
- Verify the nozzle diameter and bed dimensions match your hardware.
Is Simplify3D worth the price?
Simplify3D costs $199 one‑time, which is higher than most free alternatives.
However, its advanced support algorithm can cut material usage by up to 35 % on complex geometries, as shown in a 2024 benchmark against Cura.
For professional workshops, the time saved on post‑processing often outweighs the upfront cost.
- Use the “Support Placement” feature to generate touch‑point supports.
- Leverage the “Print‑Time Estimator” to schedule jobs more efficiently.
- Apply the “Advanced Cooling” settings for intricate overhangs.
Do I need a separate slicer if I use OctoPrint?
OctoPrint is a server‑side controller; it does not perform slicing.
You still need a slicer—such as Cura, PrusaSlicer, or Repetier‑Host—to generate G‑code.
Once sliced, upload the file to OctoPrint via its web interface or the OctoPrint API.
How do I transfer G‑code between slicers?
Export the G‑code from your original slicer as a .gcode file.
Import the same file into the target slicer by selecting “Import G‑code” in the file menu.
Be sure that both slicers reference the same printer profile; mismatches can lead to crashes or ruined prints.
- Use the “Printer Settings” tab in Cura to match the target printer’s nozzle size.
- Check the “Print Settings” tab in PrusaSlicer for consistent layer height.
- Run the “Print‑Test” mode in OctoPrint to verify the G‑code runs correctly.
What is dual extruder support?
Dual extruder capability allows a single print to combine two filaments in one job.
Common uses include printing a support material that dissolves in water or mixing a different color at a specific layer.
PrusaSlicer provides a “Dual‑extruder” toggle that automatically configures retraction and filament paths.
- Set “Extruder 2” to a sacrificial support material like PVA.
- Define a “Pause at Layer” to change filament mid‑print.
- Use the “Print‑Time” preview to schedule dual‑extruder transitions.
Can I monitor prints remotely?
Both OctoPrint and Repetier‑Host support remote dashboards that can be accessed from any web browser.
Mobile apps such as OctoEverywhere or Repetier‑Host Mobile offer push notifications for print status updates.
Integrating a simple camera feed via the OctoPrint camera plugin gives real‑time visual confirmation.
- Enable “Remote Access” under the OctoPrint settings.
- Configure a secure HTTPS connection with a reverse proxy.
- Set up email alerts for job completion or error events.
Do all slicers support PETG filament?
Most modern slicers come pre‑loaded with PETG profiles, but it’s essential to verify each one.
Typical PETG settings include a nozzle temperature of 240‑250 °C and a bed temperature of 70‑80 °C.
Repetier‑Host and Cura each allow you to tweak retraction speed to reduce stringing, a common PETG issue.
- Use the “Temperature” tab to set the correct heat values.
- Adjust “Retraction” to 4 mm at 40 mm/s for smoother prints.
- Enable “Cooling” only if the filament shows signs of overheating.
Conclusion
Choosing the best 3D printing software is less about finding a single universal hero and more about aligning features with your workflow. It boils down to three main axes: skill level, printer compatibility, and desired control.
For hobbyists and newcomers, Ultimaker Cura remains the go‑to slicer because it ships with hundreds of pre‑configured profiles and a gentle learning curve.
Advanced users who crave fine‑tuned support generation and dual‑extruder finesse typically gravitate toward PrusaSlicer or Simplify3D, both of which offer layer‑by‑layer tweaking and robust infill algorithms.
If your focus is remote monitoring, multi‑printer fleets, or a highly extensible ecosystem, OctoPrint and Repetier‑Host provide the best plug‑in flexibility and real‑time dashboards.
Actionable Next Steps
- Download a free trial of each slicer that matches your printer brand. Test the same STL on Cura, PrusaSlicer, and Simplify3D to compare preview accuracy.
- Run a calibration cube on every software. Measure dimensions with a micrometer; a deviation under 0.2 mm indicates excellent layer‑height control.
- Explore community plugins on GitHub or the slicer’s marketplace. For example, Cura’s “Support Structure Optimizer” plugin cuts support material by ~15 % on typical overhangs.
- Automate repetition with Python scripts or Repetier‑Host’s batch queue. This reduces manual re‑slicing time by 40 % for high‑volume projects.
- Leverage remote dashboards like OctoPrint’s camera overlay to catch layer failures early, cutting lost prints by 12 % on average.
Key Data Points to Keep in Mind
- According to 3DPrint.com, 68 % of hobbyists upgraded to a paid slicer after the first year of use.
- OctoPrint’s plugin library exceeds 1,200 entries, covering everything from automatic filament detection to AI‑based temperature prediction.
- PrusaSlicer’s real‑time simulation saves users an average of 30 minutes per print when fine‑tuning supports.
- Simplify3D’s proprietary support algorithm reduces post‑processing time by up to 25 % compared to standard slicers.
When evaluating software, always ask: Does this tool reduce my print failures? If the answer is yes, you’re likely on the right track.
Community and Documentation: The Unsung Heroes
One of the biggest advantages of open‑source slicers like Cura and PrusaSlicer is the vibrant community forums. New features are often discussed in real‑time, and troubleshooting threads can solve a print issue in minutes.
Official documentation is another must‑have. A well‑structured guide can cut learning time by half. For instance, the Cura Getting Started video series covers everything from material settings to advanced scripting in under 20 minutes.
Final Thought: Experiment, Iterate, Repeat
3D printing is as much art as it is engineering. The best software is the one that adapts to your evolving projects. Keep a log of settings, successes, and failures; this data will become your personal recipe book.
Ready to elevate your prints? Start by downloading a trial, experimenting with the settings above, and watching your success metrics climb. Happy printing, and may your models come out flawless!

