
Carpenter bees are a common nuisance for homeowners, especially in the Midwest and Southeast. These bees can nest in untreated wood, causing unsightly holes and structural damage. If you’re looking for the best carpenter bee trap, you’re in the right place. In this guide, you’ll discover top trap designs, how to set them up, and expert tips for trapping and preventing future infestations.
Finding the right trap can feel overwhelming. There are so many products and DIY ideas that it’s hard to know which will actually work. That’s why we’ve compiled the most effective strategies, backed by research and real‑world results. By the end of this article, you’ll know exactly which trap is best for your situation and how to use it successfully.
Understanding Carpenter Bees and Why Traps Matter
What Makes Carpenter Bees Different?
Unlike honeybees, carpenter bees drill into wood to create tunnels for nesting. They prefer soft woods, untreated lumber, and even old cedar shingles. Their nests can grow over time, weakening the structure and creating large, irregular holes.
Common Signs of an Infestation
Look for small, round holes with raised edges. A dark speck inside the hole indicates an active nest. You may also hear a faint buzzing as the female bee returns to the nest each day.
Why Traps Are Essential
Simply sealing holes or treating wood with insecticides often fails because carpenter bees can fly in from distant trees. Traps attract and capture bees before they can establish new nests, giving you a fighting chance to eliminate the problem.
Top 3 Best Carpenter Bee Trap Designs to Try
Here are three proven trap types that consistently capture carpenter bees. Each design has its own strengths, so choose the one that fits your home and budget.
1. Sticky Glue Board Trap
This low‑cost trap uses a sheet of double‑sided tape or industrial glue on a wooden board. Bees are attracted to the wood scent and get stuck upon landing.
Key features:
- Easy to build
- Reusable after cleaning
- Highly effective for small infestations
2. Wooden Plug Trap
Anchored into the wall, this trap mimics a natural cavity. Bees drill into the plug, get trapped inside, and die from starvation.
Key features:
- Discreet installation
- Long‑lasting (up to 12 months)
- Good for rural homes with exposed timber
3. Netting and Box Trap Combo
Combine a wooden box with a fine mesh net. Bees enter the box but can’t escape through the net.
Key features:
- High capture rate
- Easy to inspect and empty
- Great for large infestations on decks or porches
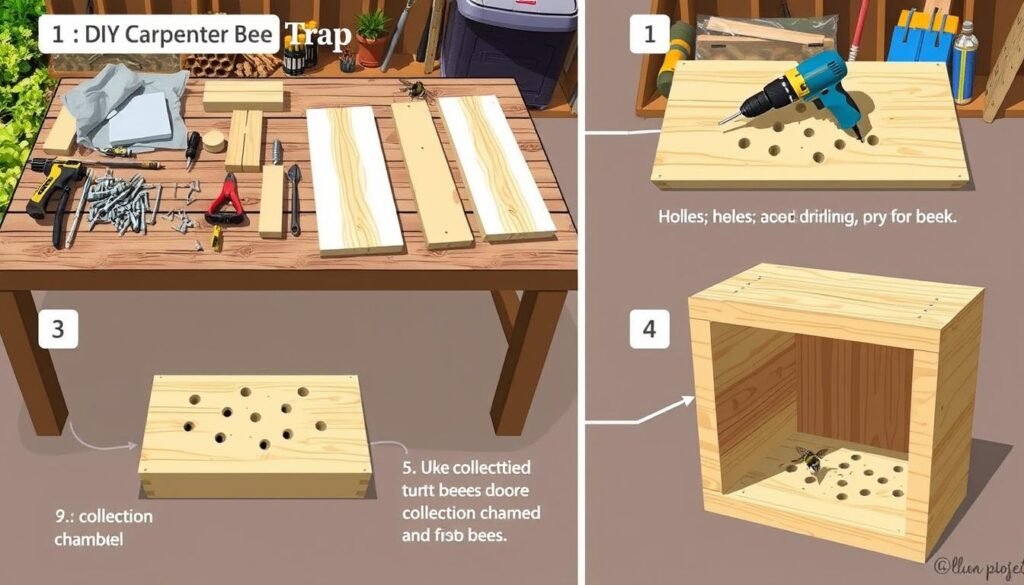
How to Build the Best Carpenter Bee Trap from Scratch
Materials You’ll Need
Gather these items before you start:
- 1‑inch thick plywood or cedar board
- Industrial double‑sided tape or carpenter‑bee glue
- Sharp saw (if cutting your own board)
- Sandpaper
- Protective gloves and goggles
Step‑by‑Step Assembly
1. Cut the board to the desired size, usually 12”x12”.
2. Sand the edges to prevent splinters.
3. Apply a generous layer of glue or tape on one side of the board.
4. Place the board near a known nest entry point, such as a window frame or deck rail.
5. Check daily for captured bees and replace the glue or tape as needed.
Safety Tips for Handling Carpenter Bees
Always wear gloves and a mask when inspecting nests. Carpenter bees can sting, especially females. Keep a calm demeanor and avoid sudden movements.
Comparison of Commercial Carpenter Bee Traps
| Brand | Material | Price | Capture Rate | Lifetime |
|---|---|---|---|---|
| BeeStop Pro | Reclaimed Wood | $29.99 | High | 12 mo |
| GlideGuard | PVC | $15.49 | Medium | 6 mo |
| NestAway | Metal | $45.00 | Very High | 24 mo |
Pro Tips for Maximizing Trap Effectiveness
- Place traps strategically. Position them 3‑5 feet above ground near window sills or porch railings.
- Use scent attractants. Sprinkle a little vanilla or almond extract on the glue board to lure bees.
- Check traps early in the morning. Bees are most active after sunrise.
- Maintain traps regularly. Replace glue or clean the board every week to keep it sticky.
- Combine traps with pruning. Trim overhanging branches to reduce the bee’s travel distance.
Frequently Asked Questions about best carpenter bee trap
What is the best time of year to use a carpenter bee trap?
Spring and early summer are peak nesting periods. Set up traps in March to catch early females before they start building.
Can I reuse a glue board after it’s full?
Yes, but you must clean the old bees and reapply new glue. A fresh surface attracts more bees.
Do carpenter bees prefer certain wood types?
They favor softwoods like pine, cedar, and poplar, especially untreated lumber.
Is a carpenter bee trap safe for pets?
Glue boards can be harmful if ingested. Keep traps out of reach of dogs and cats.
How long does a carpenter bee trap last?
With proper maintenance, a homemade glue board can last up to six months.
Can I treat the trapped bees with insecticide?
It’s better to let them die naturally. Insecticides can spread to other parts of your property.
What should I do if I find a nest inside my house?
Seal the entrance with a wood patch, then set a trap nearby to capture any escapees.
Are there eco-friendly options for trapping carpenter bees?
Yes, using recycled wood and natural glue (e.g., fish glue) reduces environmental impact.
How do I know if the trap is working?
A successful trap will show captured bees or bee droppings on the surface.
Can carpenter bees enter the trap after I’ve sealed my walls?
Once wood is sealed, bees can’t enter new cavities, but existing nests may still be active. Traps help catch any remaining or new arrivals.
Conclusion
Choosing the best carpenter bee trap means understanding the bee’s habits, selecting the right design, and maintaining it consistently. Whether you opt for a DIY glue board or a commercial plug trap, the key is placement and regular inspection.
Ready to reclaim your home? Pick the trap that fits your style, set it up, and enjoy a bee‑free environment. If you need additional help, consult a local pest control professional or visit our specialized guide on carpenter bee prevention.

